Webhook Authentication: HMAC vs JWT vs mTLS Compared
A comprehensive comparison of webhook authentication methods including HMAC-SHA256, JWT, mTLS, Basic Auth, and API Keys. Learn when to use each method, with code examples and security recommendations.
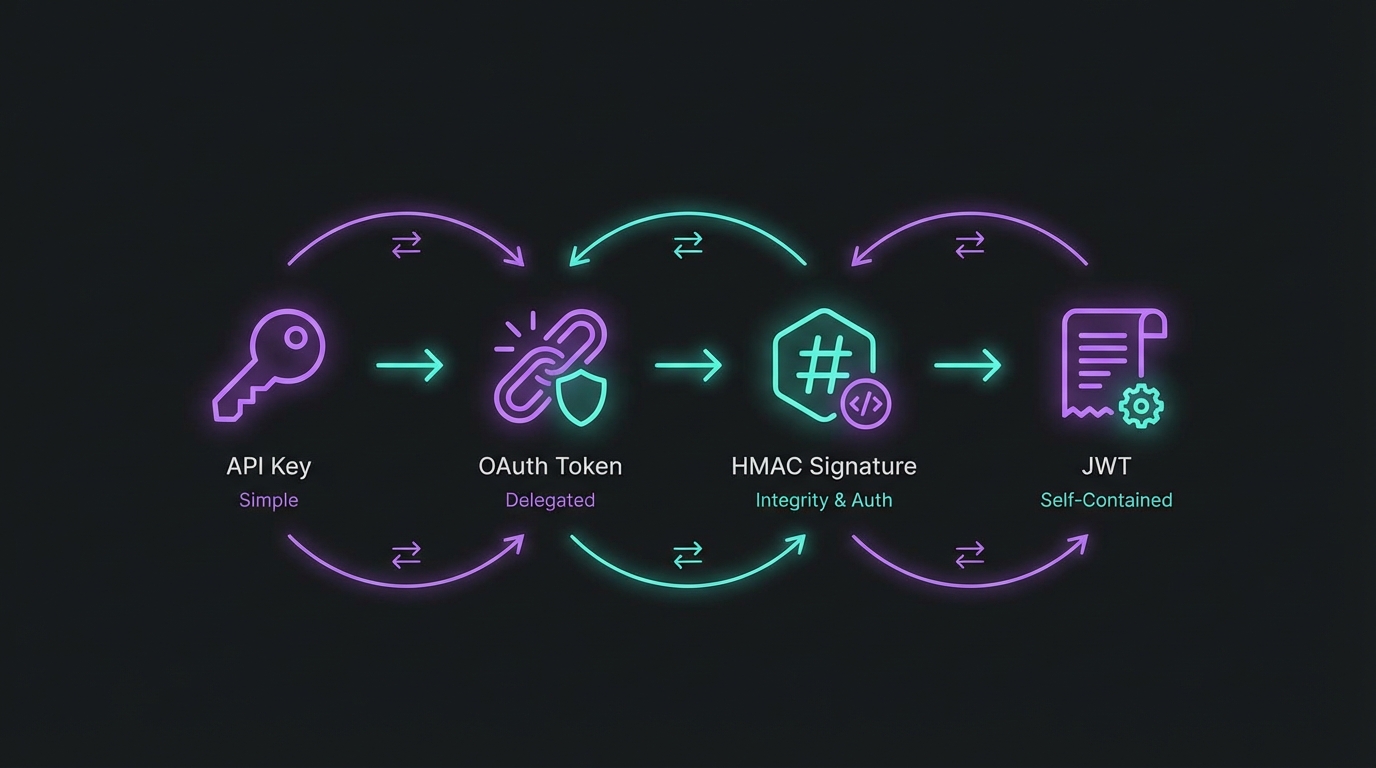
Webhook Authentication Methods Compared: HMAC, JWT, mTLS, Basic Auth
Webhook authentication verifies that incoming requests originate from legitimate sources. Without it, endpoints become vulnerable to spoofed requests and data injection.
This guide compares the five most common webhook authentication approaches to help you choose the right method for your implementation. For complete security coverage, see our webhook security best practices.
Why Webhook Authentication Matters
Webhook endpoints are publicly accessible URLs. External services push data to your servers—creating a trust problem. Without authentication, attackers can forge payloads to trigger unauthorized actions, manipulate financial transactions, or inject malicious data.
Industry Adoption
Research across 100+ webhook providers reveals clear preferences:
| Method | Adoption Rate | Trend |
|---|---|---|
| HMAC Signatures | 65% | Growing |
| No Authentication | 32% | Declining |
| API Keys/Tokens | 8% | Stable |
| JWT/OAuth | 5% | Growing |
| mTLS | <1% | Niche |
HMAC dominates because it solves three problems simultaneously: sender verification, payload integrity, and replay prevention (with timestamps).
HMAC-SHA256: The Industry Standard
HMAC (Hash-based Message Authentication Code) combined with SHA-256 is the most widely adopted webhook authentication method. It provides both sender verification and message integrity in a single mechanism.

How HMAC-SHA256 Works
- You and the webhook provider share a secret key
- The provider creates a cryptographic hash of the payload using this secret
- The signature is included in a request header
- You recalculate the hash and compare it to the received signature
- A match confirms authenticity and payload integrity
Implementation Example
Node.js Verification:
const crypto = require('crypto');

function verifyHmacSignature(payload, signature, secret, timestamp) {
  const TOLERANCE_SECONDS = 300; // 5 minutes

  // Validate timestamp to prevent replay attacks
  const currentTime = Math.floor(Date.now() / 1000);
  if (Math.abs(currentTime - parseInt(timestamp)) > TOLERANCE_SECONDS) {
    throw new Error('Timestamp outside tolerance window');
  }

  // Reconstruct the signed payload
  const signedPayload = `${timestamp}.${payload}`;

  // Calculate expected signature
  const expectedSignature = crypto
    .createHmac('sha256', secret)
    .update(signedPayload, 'utf8')
    .digest('hex');

  // Timing-safe comparison prevents timing attacks
  const isValid = crypto.timingSafeEqual(
    Buffer.from(signature, 'hex'),
    Buffer.from(expectedSignature, 'hex')
  );

  return isValid;
}
Python Verification:
import hmac
import hashlib
import time

def verify_hmac_signature(payload: str, signature: str, secret: str, timestamp: str) -> bool:
    TOLERANCE_SECONDS = 300

    # Validate timestamp
    current_time = int(time.time())
    if abs(current_time - int(timestamp)) > TOLERANCE_SECONDS:
        raise ValueError('Timestamp outside tolerance window')

    # Reconstruct signed payload
    signed_payload = f"{timestamp}.{payload}"

    # Calculate expected signature
    expected_signature = hmac.new(
        secret.encode('utf-8'),
        signed_payload.encode('utf-8'),
        hashlib.sha256
    ).hexdigest()

    # Timing-safe comparison
    return hmac.compare_digest(signature, expected_signature)
Pros and Cons
Advantages:
- Strong cryptographic security with minimal overhead
- Simple to implement in any programming language
- No external dependencies or infrastructure required
- Built-in message integrity verification
- Widely supported by webhook providers (Stripe, GitHub, Shopify)
Disadvantages:
- Requires secure secret key distribution and storage
- Secret rotation requires coordination between parties
- No built-in expiration or revocation mechanism
Real-World Implementations
Major platforms use consistent HMAC patterns with subtle variations:
| Provider | Header Name | Algorithm | Includes Timestamp |
|---|---|---|---|
| Stripe | Stripe-Signature | HMAC-SHA256 | Yes (t=) |
| GitHub | X-Hub-Signature-256 | HMAC-SHA256 | No |
| Shopify | X-Shopify-Hmac-SHA256 | HMAC-SHA256 | No |
| Slack | X-Slack-Signature | HMAC-SHA256 | Yes (X-Slack-Request-Timestamp) |
| Twilio | X-Twilio-Signature | HMAC-SHA1 | No |
When to Use HMAC-SHA256
HMAC-SHA256 is the recommended default for webhook authentication, balancing security, simplicity, and performance. Major platforms including Stripe, GitHub, Slack, and Shopify use HMAC-based signatures. See our HMAC-SHA256 webhook signatures guide for implementation details.
JWT: Bearer Tokens for Webhooks
JSON Web Tokens (JWT) provide a stateless authentication mechanism where the token itself contains verifiable claims about the sender.
How JWT Authentication Works
- The webhook provider generates a JWT signed with their private key
- The token is included in the Authorization header as a Bearer token
- You verify the signature using the provider's public key
- Claims within the token (issuer, audience, expiration) provide additional validation
Implementation Example
Node.js JWT Verification:
const jwt = require('jsonwebtoken');

function verifyJwtWebhook(token, publicKey) {
  try {
    const decoded = jwt.verify(token, publicKey, {
      algorithms: ['RS256'],
      issuer: 'webhook-provider.com',
      audience: 'your-application.com'
    });

    return { valid: true, claims: decoded };
  } catch (error) {
    return { valid: false, error: error.message };
  }
}

// Express middleware
app.post('/webhooks', (req, res) => {
  const authHeader = req.headers.authorization;
  if (!authHeader?.startsWith('Bearer ')) {
    return res.status(401).json({ error: 'Missing bearer token' });
  }

  const token = authHeader.slice(7);
  const result = verifyJwtWebhook(token, process.env.PROVIDER_PUBLIC_KEY);

  if (!result.valid) {
    return res.status(401).json({ error: 'Invalid token' });
  }

  // Process webhook with verified claims
  handleWebhookEvent(req.body, result.claims);
  res.status(200).send('OK');
});
Pros and Cons
Advantages:
- Self-contained tokens with embedded metadata
- Built-in expiration mechanism
- Supports asymmetric cryptography (public/private keys)
- No shared secret required with asymmetric signing
Disadvantages:
- More complex implementation than HMAC
- Requires JWT library dependencies
- Does not inherently verify payload integrity
When to Use JWT
JWT works when you need embedded metadata, asymmetric cryptography, or OAuth/OIDC integration. Note that JWT authenticates the sender but doesn't guarantee payload integrity unless the payload is in the token claims.
mTLS: Mutual TLS Authentication
Mutual TLS (mTLS) provides certificate-based authentication where both client and server present certificates to verify each other's identity.
How mTLS Works
- You generate a TLS certificate and share it with the webhook provider
- The provider configures their system to present their certificate and validate yours
- During the TLS handshake, both parties exchange and verify certificates
- Only connections with valid certificates are established
Configuration Example
Nginx mTLS Configuration:
server {
    listen 443 ssl;
    server_name webhooks.yourapp.com;

    ssl_certificate /etc/ssl/certs/server.crt;
    ssl_certificate_key /etc/ssl/private/server.key;

    # Require client certificate
    ssl_client_certificate /etc/ssl/certs/webhook-provider-ca.crt;
    ssl_verify_client on;
    ssl_verify_depth 2;

    location /webhooks {
        # Only requests with valid client certificates reach here
        proxy_pass http://webhook-handler;
    }
}
Pros and Cons
Advantages:
- Transport-layer security independent of application code
- Strong cryptographic identity verification
- Works with any payload format
- No per-request signature computation
- Certificate revocation provides immediate access termination
Disadvantages:
- Significant infrastructure complexity
- Certificate management overhead (issuance, renewal, revocation)
- Requires coordination of PKI between organizations
- Many webhook providers do not support mTLS
- Difficult to debug certificate issues
Why mTLS Is Often Not Recommended
Despite its strong security properties, mTLS creates significant operational burden:
- Certificate management overhead: Issuance, renewal, and revocation across multiple endpoints
- Limited provider support: Most webhook services don't support client certificates
- Debugging complexity: Certificate issues are harder to diagnose than signature failures
- Scaling challenges: Each new webhook consumer requires certificate provisioning
- Single certificate risk: Shared certificates enable cross-customer impersonation
HMAC signatures provide equivalent security for webhook payloads without the infrastructure complexity.
When to Use mTLS
mTLS is appropriate for enterprise environments with existing PKI infrastructure, high-security scenarios requiring certificate-based identity, or partners mandating certificate authentication. Operational complexity typically outweighs benefits for standard webhooks.
Basic Authentication
Basic Authentication sends credentials (username and password) encoded in Base64 within the Authorization header.
How Basic Auth Works
- You provide webhook credentials to the webhook provider
- The provider includes these credentials in every request
- Your server decodes and validates the credentials
- Requests with invalid credentials are rejected
Implementation Example
function verifyBasicAuth(authHeader, expectedUsername, expectedPassword) {
  if (!authHeader?.startsWith('Basic ')) {
    return false;
  }

  const base64Credentials = authHeader.slice(6);
  const credentials = Buffer.from(base64Credentials, 'base64').toString('utf8');
  const [username, password] = credentials.split(':');

  // Timing-safe comparison for both values
  const usernameMatch = crypto.timingSafeEqual(
    Buffer.from(username),
    Buffer.from(expectedUsername)
  );
  const passwordMatch = crypto.timingSafeEqual(
    Buffer.from(password),
    Buffer.from(expectedPassword)
  );

  return usernameMatch && passwordMatch;
}
Pros and Cons
Advantages:
- Extremely simple to implement
- Universal HTTP support
- No cryptographic libraries required
- Easy to configure and debug
Disadvantages:
- Credentials sent with every request (even over HTTPS, vulnerable to logging)
- No message integrity verification
- No replay attack protection
- Credentials can be extracted if TLS is compromised
- Considered insecure for sensitive applications
When to Use Basic Auth
Basic Auth is acceptable only for internal webhooks, development environments, or legacy systems. Never use for webhooks involving financial data, personal information, or security-sensitive operations.
API Keys: Header-Based Authentication
API key authentication uses a static token passed in a custom header to identify the sender.
How API Keys Work
- You generate an API key and share it with the webhook provider
- The provider includes this key in a header (commonly
X-API-Key) - Your server validates the key against stored values
- Invalid keys result in rejected requests
Implementation Example
const VALID_API_KEYS = new Set([
  process.env.WEBHOOK_API_KEY_PRIMARY,
  process.env.WEBHOOK_API_KEY_SECONDARY // For rotation
]);

function verifyApiKey(apiKey) {
  return VALID_API_KEYS.has(apiKey);
}

app.post('/webhooks', (req, res) => {
  const apiKey = req.headers['x-api-key'];

  if (!apiKey || !verifyApiKey(apiKey)) {
    return res.status(401).json({ error: 'Invalid API key' });
  }

  // Process webhook
  handleWebhookEvent(req.body);
  res.status(200).send('OK');
});
Pros and Cons
Advantages:
- Simple implementation and management
- Easy key rotation (support multiple active keys)
- Clear in logs and debugging
- Low computational overhead
Disadvantages:
- No message integrity verification
- No replay attack protection
- Static tokens vulnerable to interception
- Keys can leak through logs, error messages, or URL parameters
When to Use API Keys
API keys work for low-sensitivity webhooks prioritizing simplicity, internal service-to-service communication, or combined with other methods. Pair with HMAC signatures for production endpoints.
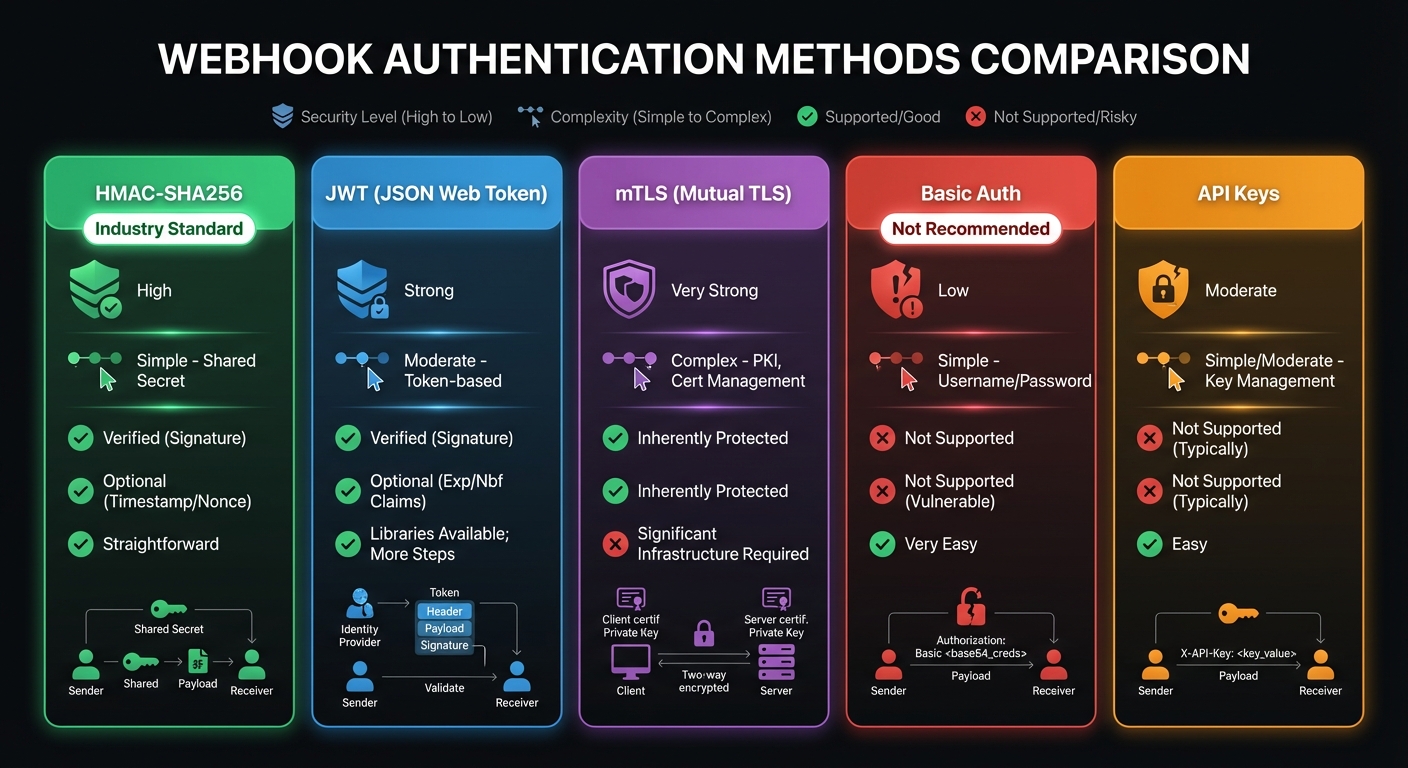
Comparison Table
| Method | Security Level | Complexity | Payload Integrity | Replay Protection | Best For |
|---|---|---|---|---|---|
| HMAC-SHA256 | High | Low | Yes | With timestamp | General purpose, recommended default |
| JWT | High | Medium | No (unless embedded) | Built-in expiration | Systems needing embedded claims |
| mTLS | Very High | Very High | No | N/A | Enterprise, regulated industries |
| Basic Auth | Low | Very Low | No | No | Development, internal tools |
| API Keys | Low-Medium | Very Low | No | No | Simple validation, combined with HMAC |
Decision Framework
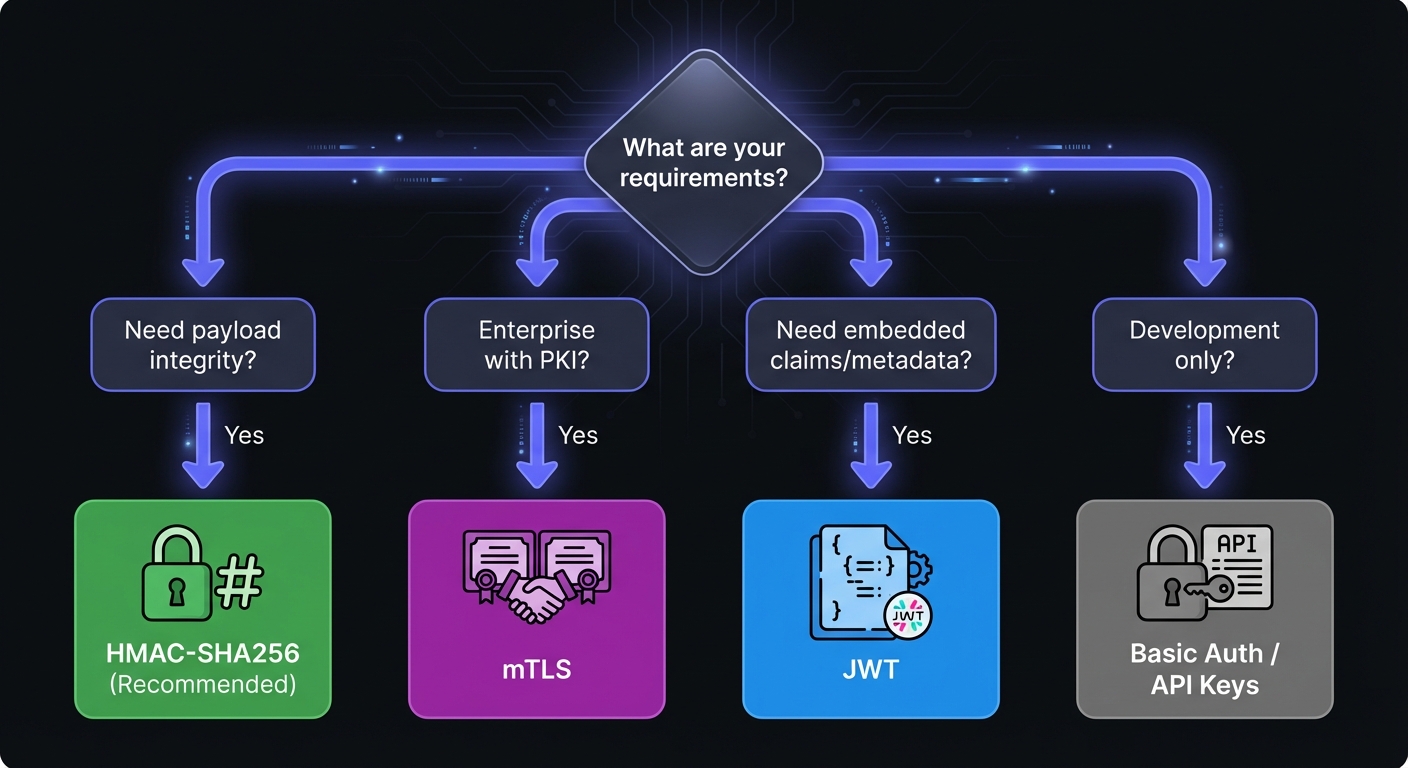
Use this framework to select the appropriate authentication method:
| Requirement | Recommended Method |
|---|---|
| General purpose, most use cases | HMAC-SHA256 |
| Embedded claims or OAuth integration | JWT |
| Regulated industry with PKI mandate | mTLS |
| Development/testing only | API Keys or Basic Auth |
| Combined sender + payload verification | HMAC-SHA256 + API Key |
Recommendations by Use Case
Startups and SMBs: Use HMAC-SHA256 with timestamp validation. It provides strong security without infrastructure complexity.
Enterprise with PKI: Consider mTLS for partners requiring certificate-based authentication, but use HMAC-SHA256 for general webhook traffic.
Financial/Payment Webhooks: HMAC-SHA256 is mandatory. Add idempotency keys for replay protection.
Internal Microservices: API keys can suffice for service mesh with network isolation, but HMAC adds defense in depth. However, be aware of SSRF attack risks when webhooks can target internal services.
Development/Testing: Basic Auth is acceptable for non-production environments with synthetic data.
Secret Rotation and Key Management
Regardless of authentication method, secure key management is critical:
Rotation Best Practices
- Support dual keys: Accept both old and new secrets during rotation windows
- Automate expiration: Set key lifetimes (90-180 days recommended)
- Zero-downtime rotation: New key becomes primary while old key remains valid temporarily
- Audit key usage: Log which key validated each request to detect delayed rotations
Implementation Pattern
const SECRETS = {
  primary: process.env.WEBHOOK_SECRET_PRIMARY,
  secondary: process.env.WEBHOOK_SECRET_SECONDARY // Previous key during rotation
};

function verifyWithRotation(payload, signature, timestamp) {
  // Try primary key first
  if (verifyHmacSignature(payload, signature, SECRETS.primary, timestamp)) {
    return { valid: true, key: 'primary' };
  }

  // Fall back to secondary during rotation window
  if (SECRETS.secondary && verifyHmacSignature(payload, signature, SECRETS.secondary, timestamp)) {
    console.warn('Request verified with secondary key - rotation may be incomplete');
    return { valid: true, key: 'secondary' };
  }

  return { valid: false };
}
Defense in Depth
No single authentication method covers all attack vectors. Layer multiple controls:
| Layer | Control | Protects Against |
|---|---|---|
| Transport | HTTPS/TLS | Eavesdropping, MITM |
| Authentication | HMAC signatures | Spoofed requests |
| Integrity | Payload hashing | Tampering |
| Freshness | Timestamp validation | Replay attacks |
| Network | IP allowlisting | Unauthorized sources |
| Application | Rate limiting | DDoS, enumeration |
Implement at minimum: HTTPS + HMAC + timestamp validation. Add IP allowlisting and rate limiting for high-value endpoints.
Why Hook Mesh Uses HMAC-SHA256
Hook Mesh chose HMAC-SHA256 as our standard because it balances security, simplicity, and industry compatibility. Our implementation includes:
- Automatic signature generation for all outbound webhooks
- Timestamp inclusion to prevent replay attacks
- One-click secret rotation with dual-key support
- Signature debugging tools in our dashboard
- Comprehensive verification SDKs for popular languages
We follow the same signing conventions as Stripe, GitHub, and other major platforms.
Conclusion
HMAC-SHA256 provides strong security and straightforward implementation for most applications. JWT offers flexibility when you need embedded claims, while mTLS serves highly regulated environments.
Avoid Basic Auth and standalone API keys for production webhooks with sensitive data. Default to HMAC-SHA256 with timestamp validation—it's the industry standard for good reason. Before deploying, use our webhook security checklist to verify your implementation covers critical controls.
Related Posts
HMAC-SHA256 Webhook Signatures: Implementation Guide
Learn how to implement secure webhook signature verification using HMAC-SHA256. Complete guide with code examples for signing and verifying webhook payloads in Node.js and Python.
Webhook Security Best Practices: The Complete Guide
Learn how to secure your webhook implementations with HMAC signature verification, replay attack prevention, SSRF mitigation, and more. Includes code examples in Node.js and Python.
Securing Webhook Endpoints: A Checklist for Production
A comprehensive, actionable security checklist for production webhook endpoints. Covers transport security, authentication, input validation, rate limiting, logging, and error handling with priority levels and code examples.
SSRF Attacks via Webhooks: Protection Strategies
Learn how Server-Side Request Forgery (SSRF) attacks exploit webhook systems, discover real-world attack scenarios targeting cloud metadata and internal services, and implement proven protection strategies to secure your infrastructure.
Clerk Webhooks: User Authentication Events
Learn how to integrate Clerk webhooks for user authentication events. Complete guide covering user.created, user.updated, session, and organization events with Svix signature verification and Node.js code examples.