How to Receive Stripe Webhooks Reliably
A comprehensive guide to setting up, verifying, and handling Stripe webhooks in production. Learn best practices for idempotency, event ordering, and building reliable webhook endpoints with Node.js and Python examples.

How to Receive Stripe Webhooks Reliably
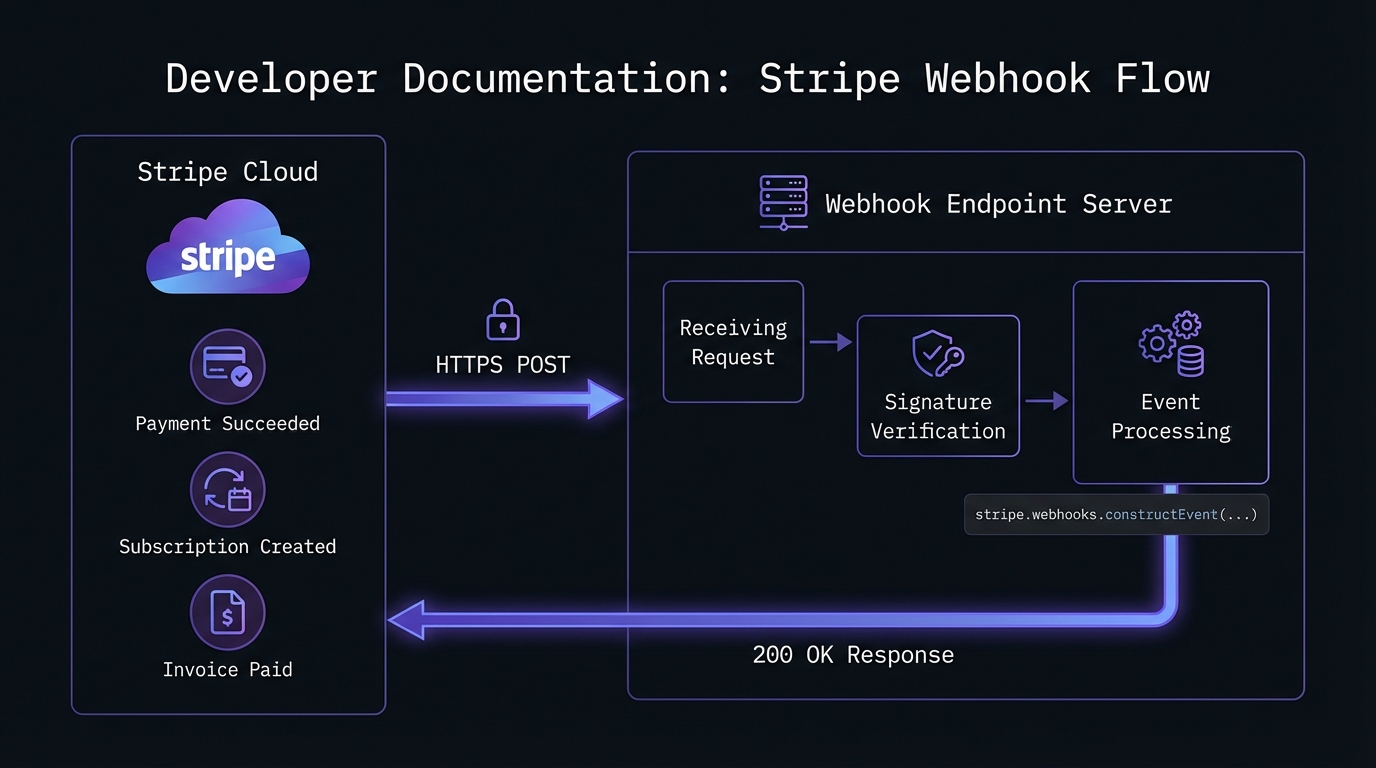
Stripe webhooks notify your application of important events—successful payments, subscription changes, failed invoices. Receiving them reliably in production is harder than it looks.
This guide covers everything from initial setup to production-ready best practices: signature verification, handling duplicates, processing asynchronously, testing, and hardening for failures.
Why Webhooks Matter for Stripe
Webhooks push critical events to your application in real-time. This matters because:
- Asynchronous payments: Bank transfers, SEPA don't complete instantly
- Subscription lifecycle: Know when subscriptions renew, cancel, or fail
- Compliance: Capture every payment event for accurate records
- User experience: Real-time UI updates on payment status
Missing a webhook means lost revenue, confused customers, or compliance issues.
Setting Up Your Stripe Webhook Endpoint
Step 1: Create Your Endpoint
Here's a basic HTTP endpoint in Node.js and Python that Stripe can POST events to.
Node.js with Express:
const express = require('express');
const stripe = require('stripe')(process.env.STRIPE_SECRET_KEY);

const app = express();

// Important: Use raw body for signature verification
app.post('/webhooks/stripe',
  express.raw({ type: 'application/json' }),
  async (req, res) => {
    const sig = req.headers['stripe-signature'];
    const endpointSecret = process.env.STRIPE_WEBHOOK_SECRET;

    let event;

    try {
      event = stripe.webhooks.constructEvent(req.body, sig, endpointSecret);
    } catch (err) {
      console.error(`Signature verification failed: ${err.message}`);
      return res.status(400).send(`Webhook Error: ${err.message}`);
    }

    // Handle the event
    await handleStripeEvent(event);

    res.json({ received: true });
  }
);

app.listen(3000, () => console.log('Webhook server running on port 3000'));
Python with Flask:
import os
import stripe
from flask import Flask, request, jsonify

app = Flask(__name__)
stripe.api_key = os.environ.get('STRIPE_SECRET_KEY')
endpoint_secret = os.environ.get('STRIPE_WEBHOOK_SECRET')

@app.route('/webhooks/stripe', methods=['POST'])
def stripe_webhook():
    payload = request.get_data()
    sig_header = request.headers.get('Stripe-Signature')

    try:
        event = stripe.Webhook.construct_event(
            payload, sig_header, endpoint_secret
        )
    except ValueError as e:
        # Invalid payload
        return jsonify({'error': 'Invalid payload'}), 400
    except stripe.error.SignatureVerificationError as e:
        # Invalid signature
        return jsonify({'error': 'Invalid signature'}), 400

    # Handle the event
    handle_stripe_event(event)

    return jsonify({'received': True}), 200

if __name__ == '__main__':
    app.run(port=3000)
Step 2: Register Your Endpoint with Stripe
In your Stripe Dashboard, navigate to Developers > Webhooks and click Add endpoint. Enter your endpoint URL and select the events you want to receive.
For most applications, these event types are essential:
| Event Type | When It Fires |
|---|---|
payment_intent.succeeded | Payment completed successfully |
payment_intent.payment_failed | Payment attempt failed |
customer.subscription.created | New subscription started |
customer.subscription.updated | Subscription plan or status changed |
customer.subscription.deleted | Subscription cancelled |
invoice.paid | Invoice payment succeeded |
invoice.payment_failed | Invoice payment failed |
charge.refunded | Refund processed |
charge.dispute.created | Customer disputed a charge |
After saving, Stripe generates a signing secret (starts with whsec_). Store this securely—you need it for signature verification.
Important: Only subscribe to events your integration actually needs. Listening to all events strains your server and increases attack surface. Start minimal and add events as requirements grow.
Production requirement: Your webhook endpoint must use HTTPS with TLS 1.2 or higher. Stripe rejects HTTP endpoints in production. Verify your SSL certificate is valid and includes intermediate certificates.
Signature Verification: Your First Line of Defense
Never process a webhook without verifying its signature. This ensures the request came from Stripe and wasn't tampered with. See our HMAC-SHA256 webhook signature verification guide for cryptographic details.
Stripe signs every webhook with a timestamp and your endpoint's secret:
- Stripe combines timestamp and payload into a signed string
- It generates an HMAC-SHA256 signature using your webhook secret
- Your server recreates and compares the signature
The code examples above handle this automatically via Stripe's SDK. Never skip this—attackers easily forge payloads without signature verification.
Handling Events: A Production-Ready Approach
Node.js:
async function handleStripeEvent(event) {
  const { type, data } = event;
  const object = data.object;

  switch (type) {
    case 'payment_intent.succeeded':
      await handleSuccessfulPayment(object);
      break;

    case 'payment_intent.payment_failed':
      await handleFailedPayment(object);
      break;

    case 'customer.subscription.created':
    case 'customer.subscription.updated':
      await syncSubscription(object);
      break;

    case 'customer.subscription.deleted':
      await handleSubscriptionCancelled(object);
      break;

    case 'invoice.paid':
      await recordInvoicePayment(object);
      break;

    case 'invoice.payment_failed':
      await handleFailedInvoice(object);
      break;

    case 'charge.dispute.created':
      await alertDisputeTeam(object);
      break;

    default:
      console.log(`Unhandled event type: ${type}`);
  }
}

async function handleSuccessfulPayment(paymentIntent) {
  const { id, amount, currency, customer, metadata } = paymentIntent;

  // Check for duplicate processing
  const existing = await db.payments.findByStripeId(id);
  if (existing) {
    console.log(`Payment ${id} already processed, skipping`);
    return;
  }

  // Record the payment
  await db.payments.create({
    stripeId: id,
    customerId: customer,
    amount: amount,
    currency: currency,
    metadata: metadata,
    processedAt: new Date()
  });

  // Trigger downstream actions
  await fulfillOrder(metadata.orderId);
  await sendReceiptEmail(customer, paymentIntent);
}
Python:
def handle_stripe_event(event):
    event_type = event['type']
    data_object = event['data']['object']

    handlers = {
        'payment_intent.succeeded': handle_successful_payment,
        'payment_intent.payment_failed': handle_failed_payment,
        'customer.subscription.created': sync_subscription,
        'customer.subscription.updated': sync_subscription,
        'customer.subscription.deleted': handle_subscription_cancelled,
        'invoice.paid': record_invoice_payment,
        'invoice.payment_failed': handle_failed_invoice,
        'charge.dispute.created': alert_dispute_team,
    }

    handler = handlers.get(event_type)
    if handler:
        handler(data_object)
    else:
        print(f'Unhandled event type: {event_type}')

def handle_successful_payment(payment_intent):
    payment_id = payment_intent['id']

    # Idempotency check
    existing = db.payments.find_by_stripe_id(payment_id)
    if existing:
        print(f'Payment {payment_id} already processed, skipping')
        return

    # Record and fulfill
    db.payments.create(
        stripe_id=payment_id,
        customer_id=payment_intent['customer'],
        amount=payment_intent['amount'],
        currency=payment_intent['currency'],
        processed_at=datetime.utcnow()
    )

    fulfill_order(payment_intent['metadata'].get('order_id'))
Common Challenges and Solutions
Challenge 1: Duplicate Events
Stripe may send the same event multiple times. Network issues, retries, and edge cases all contribute to duplicates. Your code must be idempotent—processing the same event twice should produce the same result. Our comprehensive webhook idempotency guide covers patterns for handling this correctly in payment systems.
Solution: Track processed event IDs or use natural idempotency keys:
async function processEventIdempotently(event) {
  const lockKey = `stripe_event:${event.id}`;

  // Try to acquire a lock
  const acquired = await redis.set(lockKey, '1', 'NX', 'EX', 3600);
  if (!acquired) {
    console.log(`Event ${event.id} already being processed`);
    return;
  }

  try {
    await handleStripeEvent(event);
  } finally {
    // Keep the key to prevent reprocessing
  }
}
Challenge 2: Event Ordering
Events can arrive out of order. A subscription.updated event might arrive before subscription.created. Don't assume sequential delivery.
Solution: Use timestamps and fetch current state when needed:
async function syncSubscription(subscription) {
  const existing = await db.subscriptions.findByStripeId(subscription.id);

  // Only update if this event is newer
  if (existing && existing.stripeUpdatedAt >= subscription.created) {
    console.log('Received outdated subscription event, skipping');
    return;
  }

  // For critical operations, fetch the latest state from Stripe
  const current = await stripe.subscriptions.retrieve(subscription.id);
  await db.subscriptions.upsert(current);
}
Challenge 3: Slow Processing
Stripe expects a response within 20 seconds. Long-running tasks will cause timeouts and retries. Understanding webhook retry strategies helps you design systems that handle these retries gracefully.
Solution: Acknowledge immediately, process asynchronously:
app.post('/webhooks/stripe', express.raw({ type: 'application/json' }), (req, res) => {
  // Verify signature first
  const event = verifyAndParseEvent(req);

  // Queue for async processing
  eventQueue.add('stripe-webhook', { event });

  // Respond immediately
  res.json({ received: true });
});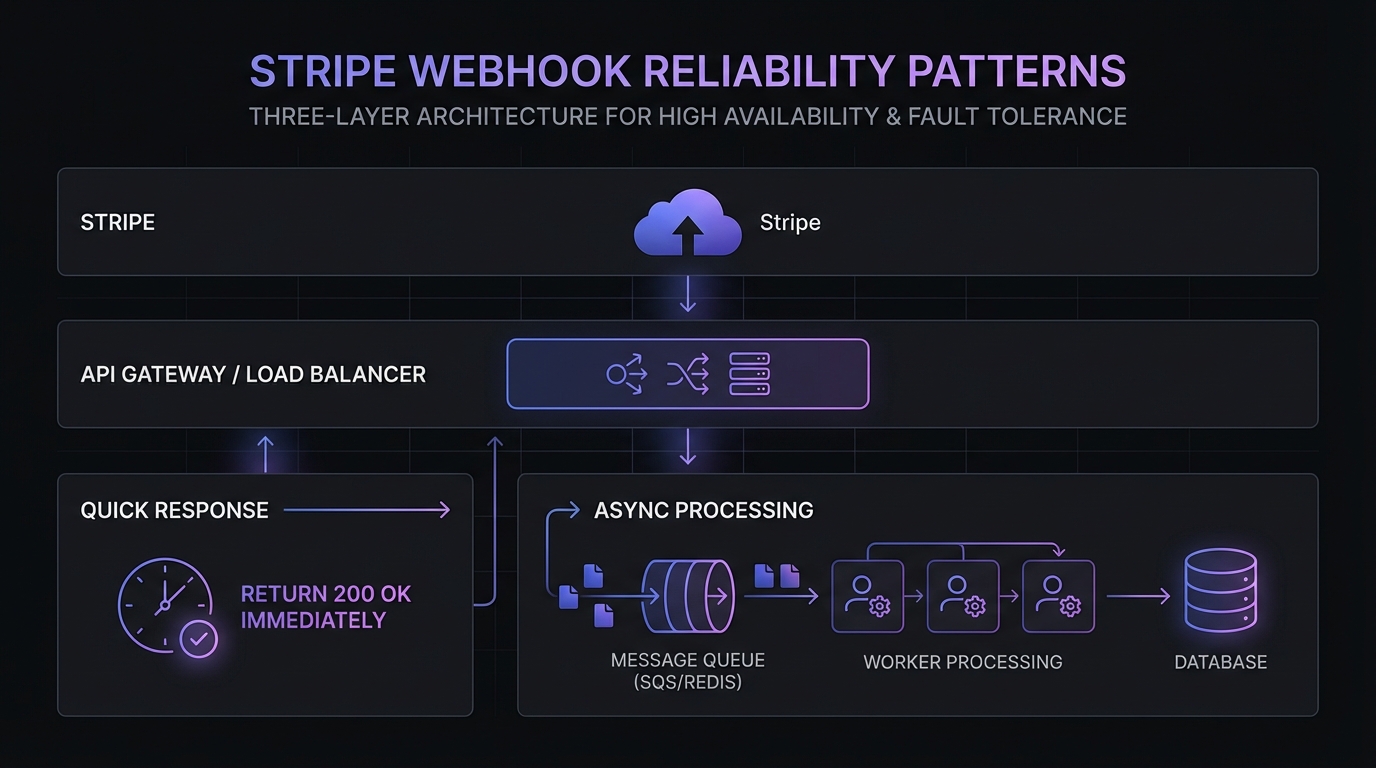
For high-volume applications, consider an architecture where your webhook endpoint only validates signatures and persists events to a queue (Redis, SQS, RabbitMQ). Separate worker processes then handle the business logic. This pattern prevents webhook timeouts and provides automatic retry capabilities through the queue.
Challenge 4: Express Middleware Ordering
A common gotcha in Node.js: if express.json() runs before your webhook route, it parses the body before signature verification, causing verification to fail.
Wrong approach:
// This breaks signature verification
app.use(express.json());
app.post('/webhooks/stripe', (req, res) => {
  // req.body is already parsed - signature verification fails!
});
Correct approach:
// Skip JSON parsing for webhook route
app.use((req, res, next) => {
  if (req.originalUrl === '/webhooks/stripe') {
    next();
  } else {
    express.json()(req, res, next);
  }
});

// Use raw body for webhook
app.post('/webhooks/stripe',
  express.raw({ type: 'application/json' }),
  handleWebhook
);
Troubleshooting Common Errors
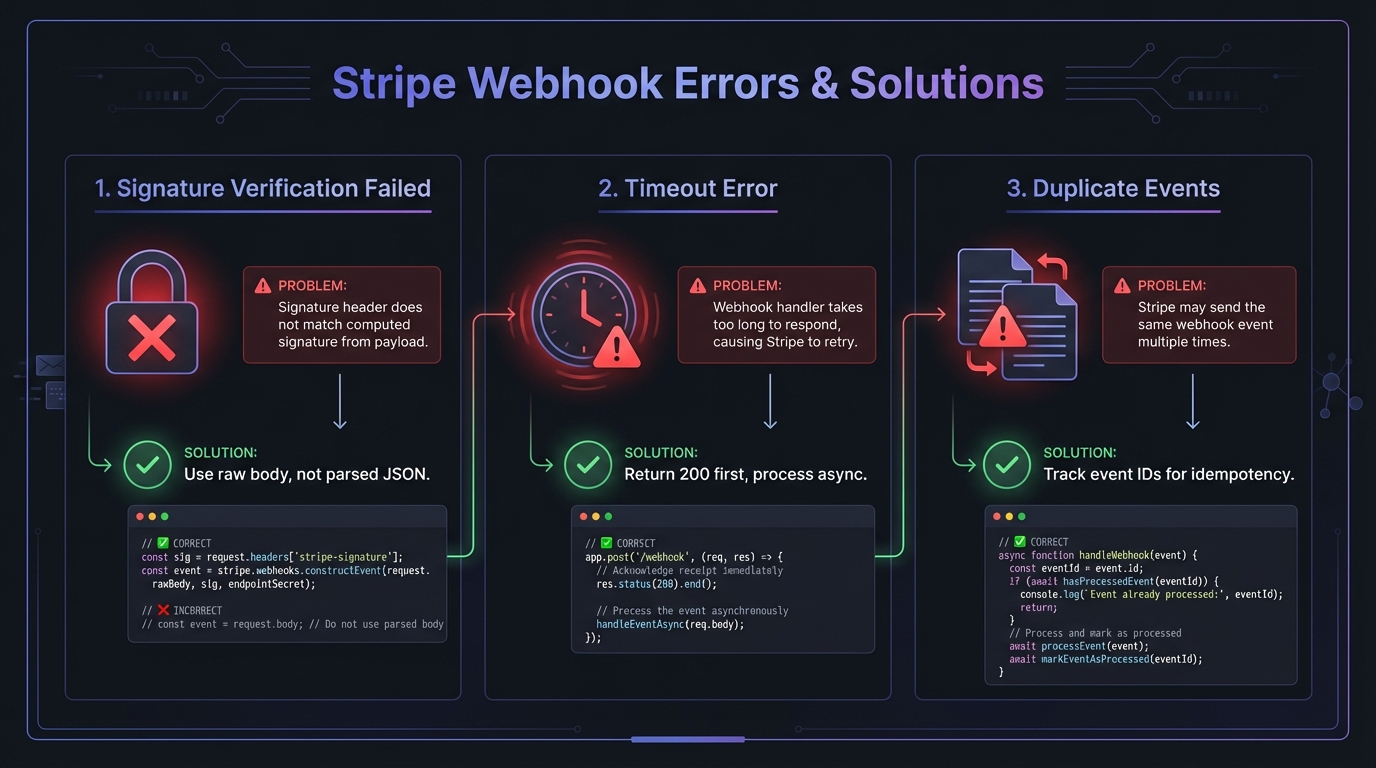
Signature Verification Failed
Causes:
- Using parsed JSON body instead of raw body
- Wrong endpoint secret (test vs production mismatch)
- Middleware modifying request body before verification
Solutions:
- Ensure
express.raw()or equivalent captures the raw body - Dashboard secrets (
whsec_...) differ from CLI secrets—use the correct one for your environment - Verify middleware ordering as shown above
Timeout Errors (5xx responses)
Causes:
- Business logic taking longer than Stripe's timeout window
- Database queries blocking the response
- External API calls in the webhook handler
Solutions:
- Return 200 immediately, process asynchronously
- Move heavy operations to background jobs
- Set up a message queue for reliable processing
Missing or Duplicate Events
Causes:
- Server downtime when Stripe attempted delivery
- Network issues causing retries
- No idempotency handling
Solutions:
- Track processed event IDs in your database
- Use Redis locks for in-progress events
- Fetch current state from Stripe API when order matters
TLS/SSL Errors
Causes:
- Invalid or expired SSL certificate
- Missing intermediate certificates
- TLS version below 1.2 (Stripe minimum requirement)
- Cloudflare minimum TLS set to 1.3 (Stripe maxes at 1.2)
Solutions:
- Test your certificate at SSL Labs
- Re-install certificate chain with intermediates
- Configure your server or CDN for TLS 1.2 compatibility
Testing with Stripe CLI
Install Stripe CLI and test locally:
# Login to your Stripe account
stripe login

# Forward webhooks to your local server
stripe listen --forward-to localhost:3000/webhooks/stripe

# In another terminal, trigger test events
stripe trigger payment_intent.succeeded
stripe trigger customer.subscription.created
The CLI displays a temporary webhook secret for local testing. This secret differs from your Dashboard secrets—use the CLI-provided secret when testing locally, and your Dashboard secret in production.
Critical: Never mix test mode and live mode secrets. Stripe signs test and live events with different keys. If your production code uses a test secret (or vice versa), signature verification fails even with correct implementation.
# Verify your environment before deploying
echo "Using webhook secret: ${STRIPE_WEBHOOK_SECRET:0:10}..."
# Should show whsec_... for Dashboard secrets
# or whsec_... (different value) for CLI secrets
Best Practices Checklist
- Uses HTTPS with TLS 1.2+ and valid certificates
- Verifies signatures on every request using raw body
- Responds quickly (under 5 seconds, ideally under 1 second)
- Handles duplicates with idempotency checks on event IDs
- Processes asynchronously for long-running tasks
- Subscribes selectively to only needed event types
- Logs everything for debugging and auditing
- Monitors failures with alerts for repeated errors
- Handles unknown events gracefully (log, don't crash)
- Uses correct secrets per environment (test vs production)
Adding a Reliability Layer with Hook Mesh
Even with perfect code, production webhook delivery faces challenges: server downtime, deployment windows, traffic spikes, and network issues. A single missed webhook can cascade into bigger problems.
Hook Mesh acts as a reliability layer between Stripe and your application. Instead of pointing Stripe directly at your server, you route webhooks through Hook Mesh, which provides:
- Automatic retries with exponential backoff when your server is unavailable
- Event buffering during deployments or outages
- Delivery guarantees so you never miss critical payment events
- Real-time monitoring with alerts when deliveries fail
- Debug tools to inspect and replay any webhook
Setting it up takes minutes: create a Hook Mesh endpoint, update your Stripe webhook URL, and add your destination. Your existing webhook code stays exactly the same—Hook Mesh just ensures every event reaches it.
For startups and SMBs processing real payments, the cost of missed webhooks (failed fulfillment, angry customers, revenue leakage) far outweighs the cost of a reliability layer. Hook Mesh handles the infrastructure complexity so you can focus on your product.
Conclusion
Stripe webhooks require careful implementation: verify signatures, handle duplicates, respond quickly, and build for failure.
Test thoroughly with the Stripe CLI and consider Hook Mesh as your reliability layer for production. For handling multiple payment providers, check out our PayPal webhooks guide. For a complete overview of payment integrations, visit our platform integrations hub.
Related Posts
PayPal Webhooks: IPN vs Webhooks, Implementation Guide
Complete guide to PayPal webhooks implementation. Learn the differences between IPN and modern webhooks, set up event listeners, verify signatures, and migrate from legacy IPN to webhooks for reliable payment notifications.
HMAC-SHA256 Webhook Signatures: Implementation Guide
Learn how to implement secure webhook signature verification using HMAC-SHA256. Complete guide with code examples for signing and verifying webhook payloads in Node.js and Python.
Webhook Idempotency: Why It Matters and How to Implement It
A comprehensive technical guide to implementing idempotency for webhooks. Learn about idempotency keys, deduplication strategies, and implementation patterns with Node.js and Python code examples.
Webhook Retry Strategies: Linear vs Exponential Backoff
A technical deep-dive into webhook retry strategies, comparing linear and exponential backoff approaches, with code examples and best practices for building reliable webhook delivery systems.
Webhook Integration Guides: Connect with Any Platform
Comprehensive guides for integrating webhooks from Stripe, GitHub, Shopify, Twilio, and 10+ other platforms. Learn best practices for reliable webhook handling across your entire stack.